Gnuplotting

Create scientific plots using gnuplot

April 16th, 2014 | 17 Comments

Gnuplot comes with the possibility of plotting histograms, but this requires that the data in the individual bins was already calculated. Here, we start with an one dimensional set of data that we want to count and plot as an histogram, similar to the hist() function we find in Octave.
Histogram of angle data

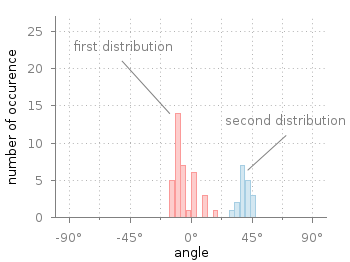
Fig. 1 Two different distributions of measured angles. (code to produce this figure, hist.fct, data)

In Fig. 1 you see two different distributions of measured angles. They were both given as one dimensional data and plotted with a defined macro that is doing the histogram calculation. The macro is defined in an additional file hist.fct and loaded before the plotting command.

binwidth = 4
binstart = -100
load 'hist.fct'
plot 'histogram.txt' i 0 @hist ls 1,\
     ''              i 1 @hist ls 2

The content of hist.fct, including the definition of @hist looks like this

# set width of single bins in histogram
set boxwidth 0.9*binwidth
# set fill style of bins
set style fill solid 0.5
# define macro for plotting the histogram
hist = 'u (binwidth*(floor(($1-binstart)/binwidth)+0.5)+binstart):(1.0) smooth freq w boxes'

For a detailed discussion on why @hist calculates a histogram you should have a look at this discussion and the documentation about the smooth freq which basically counts points with the same x-value. The other settings in the file define the width of a single bin plotted as a box and its fill style.
Histogram of angle data

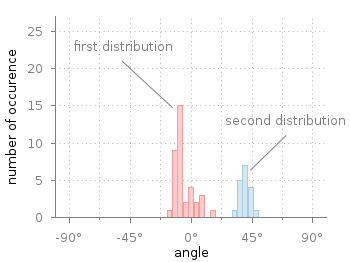
Fig. 2 Two different distributions of measured angles. The bins of the histograms are shifted to be centered around 0°. (code to produce this figure, hist.fct, data)

It is important that the two values binwidth and binstart are defined before loading the hist.fct file. These define the width of the single bins and at what position the left border of a single bin should be positioned. For example, let us assume that we want to have the bins centered around 0° as shown in Fig. 2. This can be achieved by settings the binstart to half the binwidth:

binwidth = 4
binstart = -2
load 'hist.fct'
plot 'histogram.txt' i 0 @hist ls 1,\
     ''              i 1 @hist ls 2

September 23rd, 2010 | 5 Comments

In the last entry we had mean and standard variation data for five different conditions. Now let us assume that we have only two different conditions, but have measured with three different instruments A, B and C. We have used a ANOVA to verify that the data for the two conditions are significant different. As a result the plot in Fig. 1 should be created.

statistics

Fig. 1 Plot the mean and variance of the given data (code to produce this figure)

Therefore we store our data in a format, that can be used by the index command in Gnuplot. Note that the data have two empty lines between the blocks in the real data file:

# mean      std
# A
0.77671    0.20751
0.33354    0.30969
 
 
# B
0.64258    0.22984
0.19621    0.22597
 
 
# C
0.49500    0.31147
0.14567    0.21857

Now every instrument is stored in a different data block containing both conditions as columns.

The color definitions and axes settings are done in a similar way as in the previous blog entry. Note that we have to define two more colors for the boxes, because we use three different colors. Also we define a black line to plot the significance indicator (arrow).

set style line 1 lc rgb 'gray30' lt 1 lw 2
set style line 2 lc rgb 'gray40' lt 1 lw 2
set style line 3 lc rgb 'gray70' lt 1 lw 2
set style line 4 lc rgb 'gray90' lt 1 lw 2
set style line 5 lc rgb 'black' lt 1 lw 1.5
set style fill solid 1.0 border rgb 'grey30'

The significance indicator is created by three black arrows and a text label:

# Draw line for significance test
set arrow 1 from 0,1 to 1,1 nohead ls 5
set arrow 2 from 0,1 to 0,0.95 nohead ls 5
set arrow 3 from 1,1 to 1,0.95 nohead ls 5
set label '**' at 0.5,1.05 center

For the plot the index command is used to plot first condition A, then B and then C by using block 0,1, and 2 respectively. The x-position of the boxes for instrument A are slightly shifted to the left, the ones for C to the right by subtracting or adding the value of bs. The value of bs has the width of one box in order to plot the boxes side by side.

# Size of one box
bs = 0.2
# Plot mean with variance (std^2) as boxes with yerrorbar
plot 'statistics.dat' i 0 u ($0-bs):1:($2**2) notitle w yerrorb ls 1, \
     ''               i 0 u ($0-bs):1:(bs) t 'A' w boxes ls 2, \
     ''               i 1 u 0:1:($2**2) notitle w yerrorb ls 1, \
     ''               i 1 u 0:1:(bs) t 'B' w boxes ls 3, \
     ''               i 2 u ($0+bs):1:($2**2) notitle w yerrorb ls 1, \
     ''               i 2 u ($0+bs):1:(bs) t 'C' w boxes ls 4

September 9th, 2010 | No Comments

If we have done a experiment in order to apply a significance test like a ANOVA to our measured data, we are interested in presenting our statistical data in a familiar way.
Let us assume we have the following mean and standard deviation data for five different conditions:

"A"     0.66257     0.41854
"B"     0.70842     0.38418
"C"     0.66733     0.44059
"D"     0.45375     0.52384
"E"     0.43900     0.53116

The results for the last two conditions are significant different from the first ones. Using this data we want to create a plot that looks like the one in Fig. 1.

mean and variance

Fig. 1 Plot the mean and variance of the given data (code to produce this figure)

To achieve the plot in Fig. 1 we have to define two different color styles for the color of the errorbars and the color of the boxes. Also, we need the fill style (solid) for the boxes and the gray line around the boxes which is given by the border rgb 'grey30' option to the set style fill command. For the line color we choose the same color as for the errorbars:

set style line 1 lc rgb 'grey30' ps 0 lt 1 lw 2
set style line 2 lc rgb 'grey70' lt 1 lw 2
set style fill solid 1.0 border rgb 'grey30'

For the first line style which is used to plot the errorbars also a point size of 0 is specified in order to plot only the errorbars and no points on top of the boxes.

The *-dots above the two last conditions to indicate their significant difference are just added as labels. The border of the graph on the top and right side is removed by set border 3 (see here for an explanation of the number codes) and by using the nomirror option for the tics. The xtics are not visible, because we set them to scale 0.

set label '*' at 3,0.8 center
set label '*' at 4,0.8 center
set border 3
set xtics nomirror scale 0
set ytics nomirror out scale 0.75 0.5

Then we plot first the errorbars in order to overlay the boxes on it, so only the top half of the errorbars will be visible. Note that we have standard deviation data in the data file, therefore we have to use their squares in order to get the variance. As xtic labels we use the first row in the data file by appending xtic(1):

plot 'simple_statistics.dat' u 0:2:($3**2) w yerrorbars ls 1, \
     ''                      u 0:2:(0.7):xtic(1) w boxes ls 2